A Wi-Fi deauthentication attack, also known as a “deauth attack” or “disassociation attack,” is a type of denial-of-service that targets wireless networks. The primary goal of this attack is to disconnect or deauthenticate devices (such as smartphones, laptops, cameras or IoT devices) from a Wi-Fi network. This can be done by anyone with a Wi-Fi enabled device and the right software. Fortunately, it is possible to detect such attack. Our goal will be to recognize such attack and to push it bit further, to receive a notification on a smartphone about it.
Detect deauthentication attack
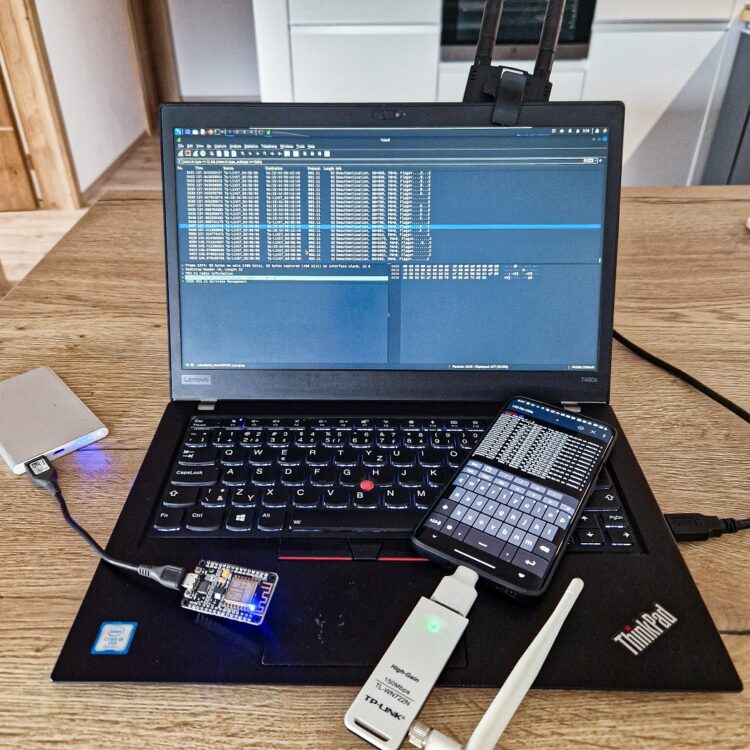
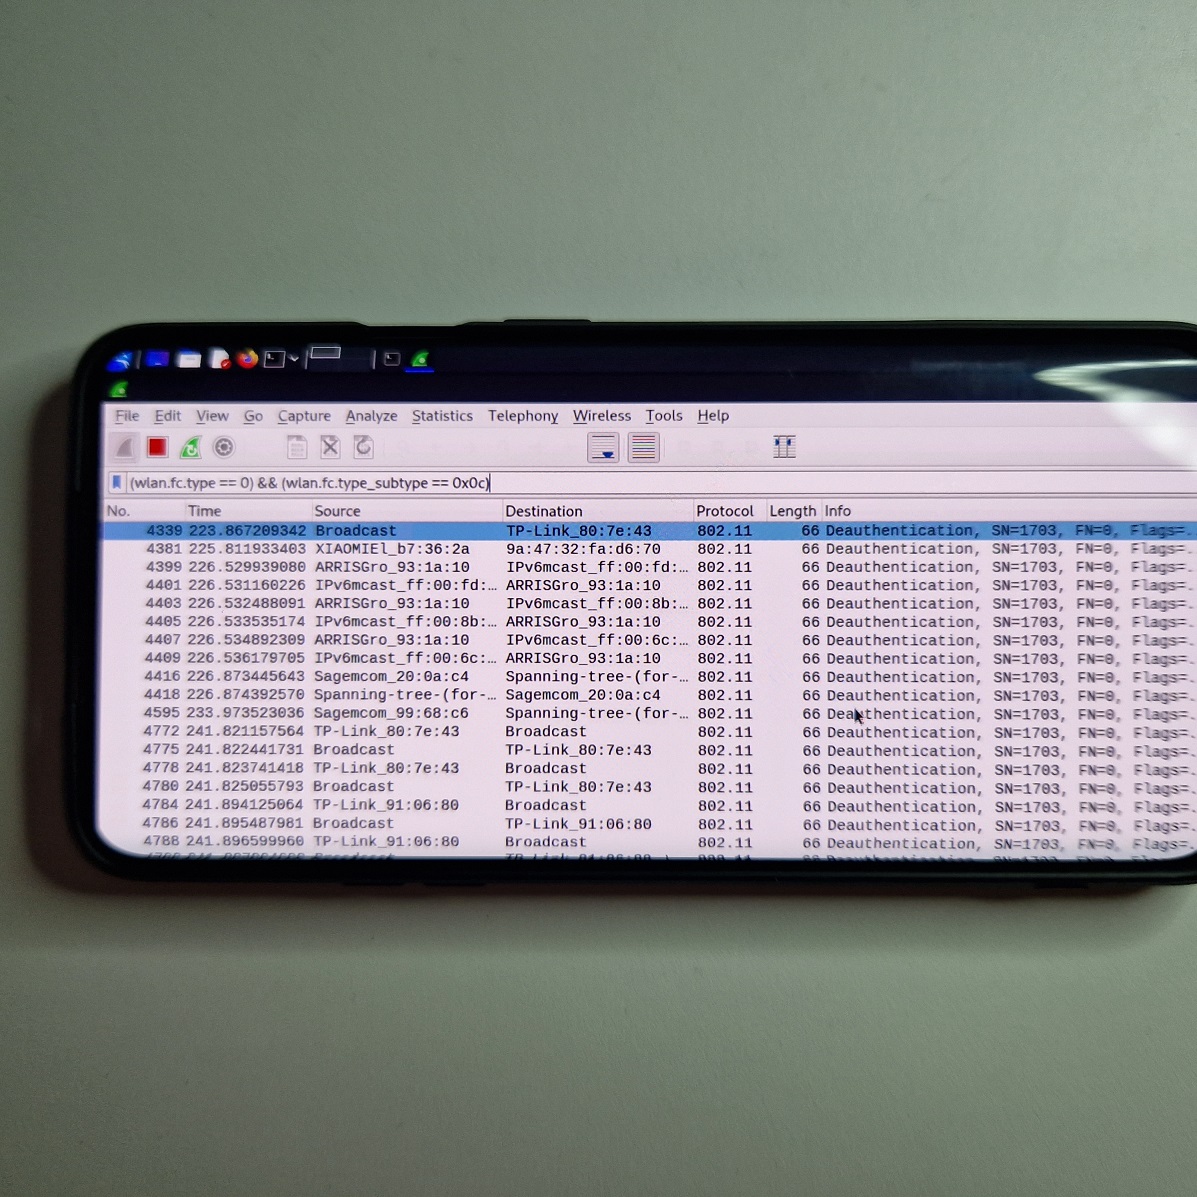
One way to identify deauth is to put your Wi-Fi adapter into monitor mode and run Wireshark, which will sniff all Wi-Fi traffic and allows you to filter for deauthentication packets using filter such as:
(wlan.fc.type == 0) && (wlan.fc.type_subtype == 0x0c) This can be done using desktop or Wireshark running on Android, see Figure 1. Here is a quick video tutorial how to setup and run it.
The other pretty cheap, easy, and convenient way is using Arduino ESP8266 or ESP32 board by running DeauthDetector created by Stefan Kremser. This tool works by monitoring the Wi-Fi network for deauthentication packets and alerting the user if one is detected by turning LED on. The tool is particularly programmed for Arduino ESP8266. Compiling and uploading the sketch is straightforward, without any issues and well explained on the GitHub page.
If the sketch is successfully uploaded on to ESP8266, then if you plug it in USB it enables monitor mode and starts to sniff wireless packets. When deauthentication packets are detected, then LED will turn on during the attack. If deauth packet are not recognized anymore, then LED will turn off. Pretty simply. You can see the demonstration in the video below.
Detect deauthentication attack and get smartphone notification
Previously described scenarios are effective, however, user needs to be in the vicinity of the deauth attack to either see the packets in Wireshark or LED being enabled. Otherwise, attack can’t be recognized or logged. Because of that, I implemented a communication of the ESP8266 with the cloud service that would push pop-ups on my smartphone, notifying me about deauthentication attack whenever I am. It sounds easy, but there are some obstacles. If the board is under deauth attack, obviously it can’t connect to cloud and send a message. This means, that using just ESP board, without additional modules, it isn’t possible to immediately notify user during the attack, only after it ends. However, it could be possible with additional modules, such as:
- Bluetooth (local, not very practical)
- GSM (send SMS)
- SD card (create logs when attack started, afterwards send notification)
Since I don’t have any of these modules, I decided to accomplish it with a different approach, which is to receive notification right after attack ends, to at least be aware of it.
Implementation
My goal is to use DeauthDetector sketch with a cloud service to receive instant push notifications on my phone. There are plenty such cloud services, I used Pushover, that is free for 30 days. Setup of Pushover account and API is out of scope for this post, however I advise you to follow this in detail tutorial (I followed it as well).
If you would like to test this out, I will provide you the whole script that you can just copy in your Arduino IDE and upload to ESP8266. Don’t forget to enter correct values for your Wi-Fi network (ssid), password (password), Pushover user (userToken) and API key (apiToken).
The sketch below will send notification to user smartphone after deauth attack stopped or if it is not recognized by the board anymore. It is very simple, but it seems that after disabling monitor mode or being under deauth attack, ESP8266 has problem to reconnect to Wi-Fi network. Because of that, the only working solution was to restart the ESP8266 after the attack. Following restart, it successfully connects to internet and sends notification. This communication is called in setup() method, which means that after user plugs the ESP8266 to USB for the first time, the notification will be sent to smartphone. It is important to understand that this first notification is false positive. All other received alerts should successfully detect deauthentication attack and notify you. In the video below you can see its demonstration.
Feel free to test it yourself, using code below.
#include <WiFiClientSecure.h>

#include <ArduinoJson.h>

#include <ESP8266WiFi.h>

#include <ESP8266HTTPClient.h>

// include ESP8266 Non-OS SDK functions

extern "C" {

#include "user_interface.h"

}

// ===== SETTINGS ===== //

#define LED 2              /* LED pin (2=built-in LED) */

#define LED_INVERT true    /* Invert HIGH/LOW for LED */

#define SERIAL_BAUD 115200 /* Baudrate for serial communication */

#define CH_TIME 140        /* Scan time (in ms) per channel */

#define PKT_RATE 5         /* Min. packets before it gets recognized as an attack */

#define PKT_TIME 1         /* Min. interval (CH_TIME*CH_RANGE) before it gets recognized as an attack */

const char* ssid = “wifi_network“;

const char* password = "wifi_network password";

const char* apiToken = "your pushover api token";

const char* userToken = "your pushover  user token";

//Pushover API endpoint

const char* pushoverApiEndpoint = "https://api.pushover.net/1/messages.json";

//Pushover root certificate (valid from 11/10/2006 to 11/10/2031)

const char *PUSHOVER_ROOT_CA = "-----BEGIN CERTIFICATE-----\n"

                 "MIIDrzCCApegAwIBAgIQCDvgVpBCRrGhdWrJWZHHSjANBgkqhkiG9w0BAQUFADBh\n"

                 "MQswCQYDVQQGEwJVUzEVMBMGA1UEChMMRGlnaUNlcnQgSW5jMRkwFwYDVQQLExB3\n"

                 "d3cuZGlnaWNlcnQuY29tMSAwHgYDVQQDExdEaWdpQ2VydCBHbG9iYWwgUm9vdCBD\n"

                 "QTAeFw0wNjExMTAwMDAwMDBaFw0zMTExMTAwMDAwMDBaMGExCzAJBgNVBAYTAlVT\n"

                 "MRUwEwYDVQQKEwxEaWdpQ2VydCBJbmMxGTAXBgNVBAsTEHd3dy5kaWdpY2VydC5j\n"

                 "b20xIDAeBgNVBAMTF0RpZ2lDZXJ0IEdsb2JhbCBSb290IENBMIIBIjANBgkqhkiG\n"

                 "9w0BAQEFAAOCAQ8AMIIBCgKCAQEA4jvhEXLeqKTTo1eqUKKPC3eQyaKl7hLOllsB\n"

                 "CSDMAZOnTjC3U/dDxGkAV53ijSLdhwZAAIEJzs4bg7/fzTtxRuLWZscFs3YnFo97\n"

                 "nh6Vfe63SKMI2tavegw5BmV/Sl0fvBf4q77uKNd0f3p4mVmFaG5cIzJLv07A6Fpt\n"

                 "43C/dxC//AH2hdmoRBBYMql1GNXRor5H4idq9Joz+EkIYIvUX7Q6hL+hqkpMfT7P\n"

                 "T19sdl6gSzeRntwi5m3OFBqOasv+zbMUZBfHWymeMr/y7vrTC0LUq7dBMtoM1O/4\n"

                 "gdW7jVg/tRvoSSiicNoxBN33shbyTApOB6jtSj1etX+jkMOvJwIDAQABo2MwYTAO\n"

                 "BgNVHQ8BAf8EBAMCAYYwDwYDVR0TAQH/BAUwAwEB/zAdBgNVHQ4EFgQUA95QNVbR\n"

                 "TLtm8KPiGxvDl7I90VUwHwYDVR0jBBgwFoAUA95QNVbRTLtm8KPiGxvDl7I90VUw\n"

                 "DQYJKoZIhvcNAQEFBQADggEBAMucN6pIExIK+t1EnE9SsPTfrgT1eXkIoyQY/Esr\n"

                 "hMAtudXH/vTBH1jLuG2cenTnmCmrEbXjcKChzUyImZOMkXDiqw8cvpOp/2PV5Adg\n"

                 "06O/nVsJ8dWO41P0jmP6P6fbtGbfYmbW0W5BjfIttep3Sp+dWOIrWcBAI+0tKIJF\n"

                 "PnlUkiaY4IBIqDfv8NZ5YBberOgOzW6sRBc4L0na4UU+Krk2U886UAb3LujEV0ls\n"

                 "YSEY1QSteDwsOoBrp+uvFRTp2InBuThs4pFsiv9kuXclVzDAGySj4dzp30d8tbQk\n"

                 "CAUw7C29C79Fv1C5qfPrmAESrciIxpg0X40KPMbp1ZWVbd4=\n"

                 "-----END CERTIFICATE-----\n";

// Create a list of certificates with the server certificate

X509List cert(PUSHOVER_ROOT_CA);

// Channels to scan on (US=1-11, EU=1-13, JAP=1-14)

const short channels[] = { 1,2,3,4,5,6,7,8,9,10,11,12,13/*,14*/ };

// ===== Runtime variables ===== //

int ch_index { 0 };               // Current index of channel array

int packet_rate { 0 };            // Deauth packet counter (resets with each update)

int attack_counter { 0 };         // Attack counter

unsigned long update_time { 0 };  // Last update time

unsigned long ch_time { 0 };      // Last channel hop time

void connect(){

  Serial.begin(115200);

  WiFi.begin(ssid, password);

  while (WiFi.status() != WL_CONNECTED) {

    delay(1000);

    Serial.println("Connecting to WiFi...");

  }

  Serial.println("Connected to WiFi");

  // Set time via NTP, as required for x.509 validation

  configTime(3 * 3600, 0, "pool.ntp.org", "time.nist.gov");

  Serial.print("Waiting for NTP time sync: ");

  time_t now = time(nullptr);

  while (now < 8 * 3600 * 2) {

    delay(500);

    Serial.print(".");

    now = time(nullptr);

  }

  Serial.println("");

  struct tm timeinfo;

  gmtime_r(&now, &timeinfo);

  Serial.print("Current time: ");

  Serial.print(asctime(&timeinfo));

  //Make HTTPS POST request to send notification

  if (WiFi.status() == WL_CONNECTED) {

    // Create a JSON object with notification details

    // Check the API parameters: https://pushover.net/api

    StaticJsonDocument<512> notification;

    notification["token"] = apiToken;

    notification["user"] = userToken;

    notification["message"] = "Under deauth attack";

    notification["title"] = "ESP8266";

    notification["url"] = "";

    notification["url_title"] = "";

    notification["html"] = "";

    notification["priority"] = "";

    notification["sound"] = "cosmic";

    notification["timestamp"] = "";

    // Serialize the JSON object to a string

    String jsonStringNotification;

    serializeJson(notification, jsonStringNotification);

    // Create a WiFiClientSecure object

    WiFiClientSecure client;

    // Set the certificate

    client.setTrustAnchors(&cert);

    // Create an HTTPClient object

    HTTPClient http;

    // Specify the target URL

    http.begin(client, pushoverApiEndpoint);

    // Add headers

    http.addHeader("Content-Type", "application/json");

    // Send the POST request with the JSON data

    int httpResponseCode = http.POST(jsonStringNotification);

    // Check the response

    if (httpResponseCode > 0) {

      Serial.printf("HTTP response code: %d\n", httpResponseCode);

      String response = http.getString();

      Serial.println("Response:");

      Serial.println(response);

    } else {

      Serial.printf("HTTP response code: %d\n", httpResponseCode);

    }

    // Close the connection

    http.end();

  }

}

// ===== Sniffer function ===== //

void sniffer(uint8_t *buf, uint16_t len) {

  if (!buf || len < 28) return; // Drop packets without MAC header

  byte pkt_type = buf[12]; // second half of frame control field

  //byte* addr_a = &buf[16]; // first MAC address

  //byte* addr_b = &buf[22]; // second MAC address

  // If captured packet is a deauthentication or dissassociaten frame

  if (pkt_type == 0xA0 || pkt_type == 0xC0) {

    ++packet_rate;

  }

}

// ===== Attack detection functions ===== //

void attack_started() {

  digitalWrite(LED, !LED_INVERT); // turn LED on

  Serial.println("ATTACK DETECTED");

}

void attack_stopped() {

  digitalWrite(LED, LED_INVERT); // turn LED off

  Serial.println("ATTACK STOPPED");

  Serial.begin(115200);

  ESP.restart();

}

// ===== Setup ===== //

void setup() {

  connect();

  Serial.begin(SERIAL_BAUD); // Start serial communication

  pinMode(LED, OUTPUT); // Enable LED pin

  digitalWrite(LED, LED_INVERT);

  WiFi.disconnect();                   // Disconnect from any saved or active WiFi connections

  wifi_set_opmode(STATION_MODE);       // Set device to client/station mode

  wifi_set_promiscuous_rx_cb(sniffer); // Set sniffer function

  wifi_set_channel(channels[0]);        // Set channel

  wifi_promiscuous_enable(true);       // Enable sniffer

  Serial.println("Started \\o/");

}

// ===== Loop ===== //

void loop() {

  unsigned long current_time = millis(); // Get current time (in ms)

  // Update each second (or scan-time-per-channel * channel-range)

  if (current_time - update_time >= (sizeof(channels)*CH_TIME)) {

    update_time = current_time; // Update time variable

    // When detected deauth packets exceed the minimum allowed number

    if (packet_rate >= PKT_RATE) {

      ++attack_counter; // Increment attack counter

    } else {

      if(attack_counter >= PKT_TIME) attack_stopped();

      attack_counter = 0; // Reset attack counter

    }

    // When attack exceeds minimum allowed time

    if (attack_counter == PKT_TIME) {

      attack_started();

    }

    Serial.print("Packets/s: ");

    Serial.println(packet_rate);

    packet_rate = 0; // Reset packet rate

  }

  // Channel hopping

  if (sizeof(channels) > 1 && current_time - ch_time >= CH_TIME) {

    ch_time = current_time; // Update time variable

    // Get next channel

    ch_index = (ch_index+1) % (sizeof(channels)/sizeof(channels[0]));

    short ch = channels[ch_index];

    // Set channel

    //Serial.print("Set channel to ");

    //Serial.println(ch);

    wifi_set_channel(ch);

  }

}
How to prevent WiFi deauthentication attacks
- Enable Protected Management Frames (802.11w) on your router, which validates deauth frames and discards spoofed ones.
- Alternatively, you can use 5GHz network in case that deauth affects only 2.4GHz network.
- In router settings, you can hide SSID. It might be a small obstacle for an unexperienced attacker.
- Remember, you have no control over free public Wi-Fi and its security.
- Using Arduino and simple sketch, you can detect deauth attack, however, not prevent it.
It’s important to note that these strategies do not guarantee complete protection, but they can help make your network more resilient to them.
Conclusion
Deauthentication attacks are a serious threat to Wi-Fi networks. However, with the help of tools like Wireshark and ESP8266 Deauth Detector, we can detect these attacks and take appropriate measures to prevent them. The ESP8266 microcontroller is a cheap and powerful IoT module that can be used to build security tools that take advantage of serious flaws in the WPA2 Wi-Fi standard. By monitoring the Wi-Fi network for deauthentication packets, we can detect these attacks and protect our devices from being disconnected from the network.
hello there and thank you for your info – I’ve definitely picked up anything new from right here.
I did however expertise some technical issues using this web site, since I experienced
to reload the web site a lot of times previous
to I could get it to load properly. I had been wondering if your
web hosting is OK? Not that I’m complaining, but sluggish loading instances times will sometimes affect your placement
in google and can damage your high quality score if advertising and marketing with Adwords.
Well I am adding this RSS to my e-mail and could look out for much more of your respective exciting content.
Ensure that you update this again soon.
Great idea! I too was thinking that the LED light would only be useful when it is right in front of you. However, once in another room or outside the house… not so useful. I have been playing around your code and have a question: Considering the WiFi Ch and packet type can be assigned, would be possible to narrow down the alerts to a single or multiple networks? In the original code (and yours) where the sniffer funtion is called, there are two unused lines of code referring to MAC addresses. I cannot seem to figure out if these would be where one can specify an APs MAC address and the proper way to do it. I have set the detector to scan only one channel, but I am getting quite a few false positives. Would it also be possible to have it look for a certain reason deauth code? Thanks for your hardwork!