
This blog will provide you with information on the several techniques and tools used to attack Wi-Fi networks using NetHunter app. We’ll talk about the various tools such as the wifite, shed light on the deauthentication attack technique, and explore the concept of wardriving. Additionally, we will discuss security precautions and countermeasures against these threats. If you are not sure what wireless adapter to use and how to check its compatibility, make sure to check my previous blog on this topic. So, keep learning and pay close attention.
Hacking Wi-Fi network using wifite
It is a wireless network auditing tool that runs from the command line and automates wireless network attacks by using aircrack-ng, pyrit, reaver, tshark tools to perform the audit. It works with Wi-Fi interfaces that support the monitor mode, which enables the tool to capture wireless network traffic and conduct simultaneous attacks on various networks.
Wifite performs several tests on a target wireless network, display ESSID information, list connected clients, perform offline Pixie-Dust, online PIN bruteforce, WEP attacks, capture PMKID hash and WPA handshake and tries to crack it offline. All of these are executed in the row, so you don’t have to remember all the commands and their arguments.
It can also carry out a deauthentication attack, which can be used to disconnect devices from a wireless network (like the “deauth” option in the Nethunter app).
It is important to remember that, in most countries, using this program on any network without the network administrator’s authorization is prohibited. It is for testing and educational purpose only.
Wifite capabilities
Wifite is preinstalled in NetHunter. You can launch it from NetHunter Terminal or from NetHunter app -> Custom Commands -> Launch Wifite. If you are using external Wi-Fi adapter, Wifite will automatically enable monitor mode. When I use internal wlan0 interface, I must manually enable it using command airmon-ng start wlan0.
After start, it will ask you which interface you would like to use. If you are using built-in wlan0 as I, then it will be automatically selected. Scanning for available Wi-Fi networks will follow. Result of ongoing scan displays access point names, channels, type of encryption, power or distance from access point, WPS setting and number of connected clients as you can see on Figure 1.
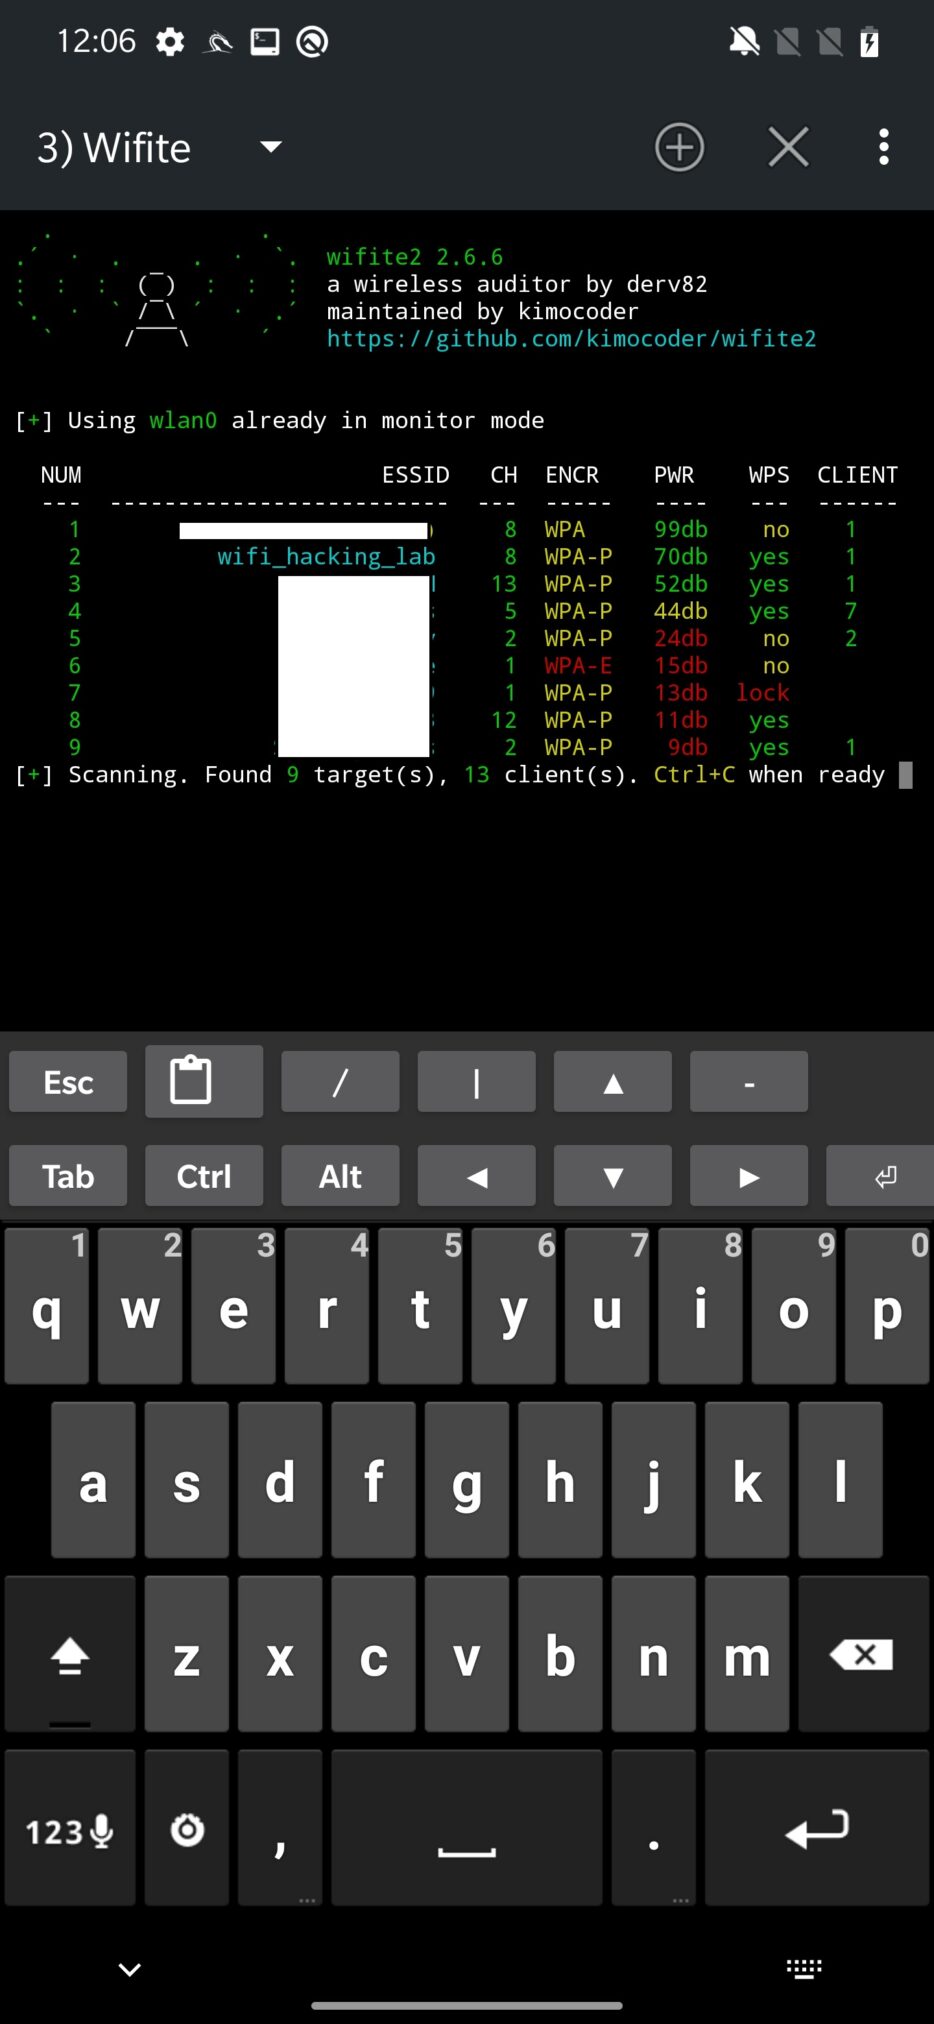
When you picked which access point to target, you need to press Ctrl+C to interrupt scanning process and continue by selecting number of the target or targets separated by commas. You can also target all of them at once 😊.
The first automatically launched attack is WPS Pixie-Dust against the access point as displayed on Figure 2. You can wait for its results to see if it is vulnerable and obtain WPA password or kill it, again using Ctrl+C.
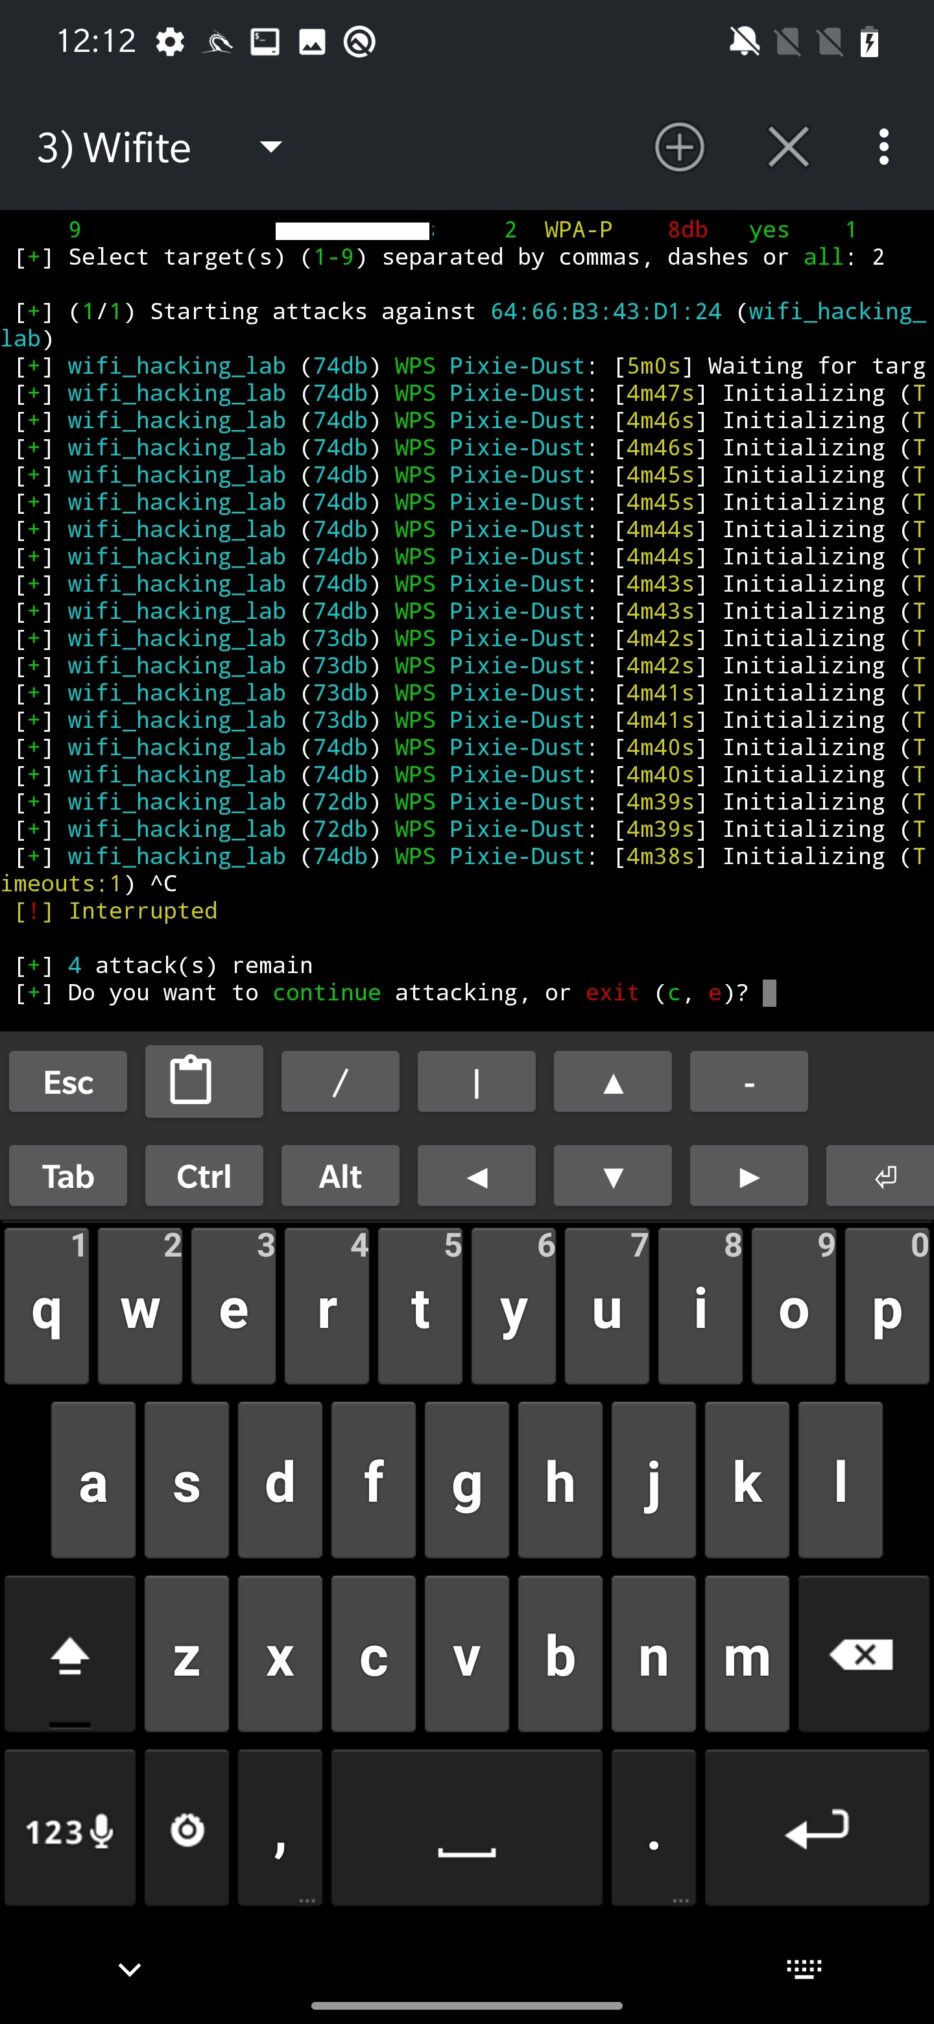
Wifite will continue with WPS NULL PIN attack.
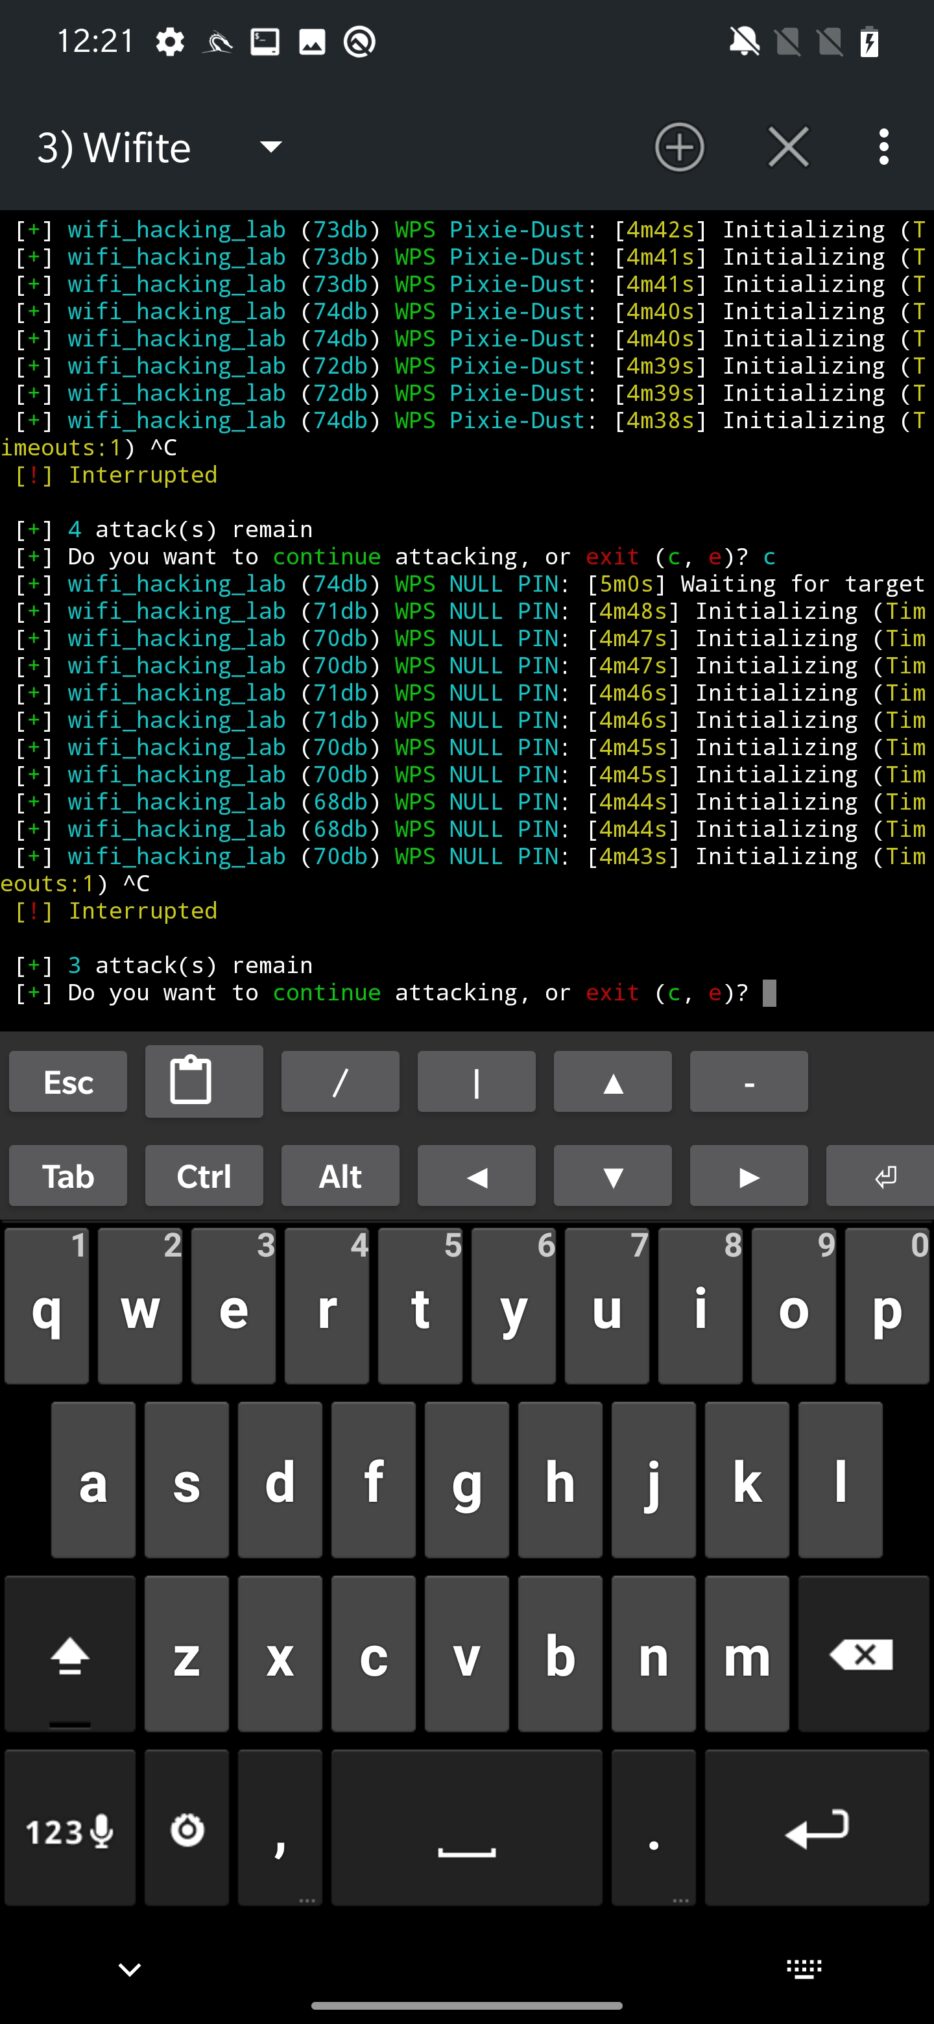
The third attack in the row is WPS PIN Attack, which tries to bruteforce the WPS PIN.
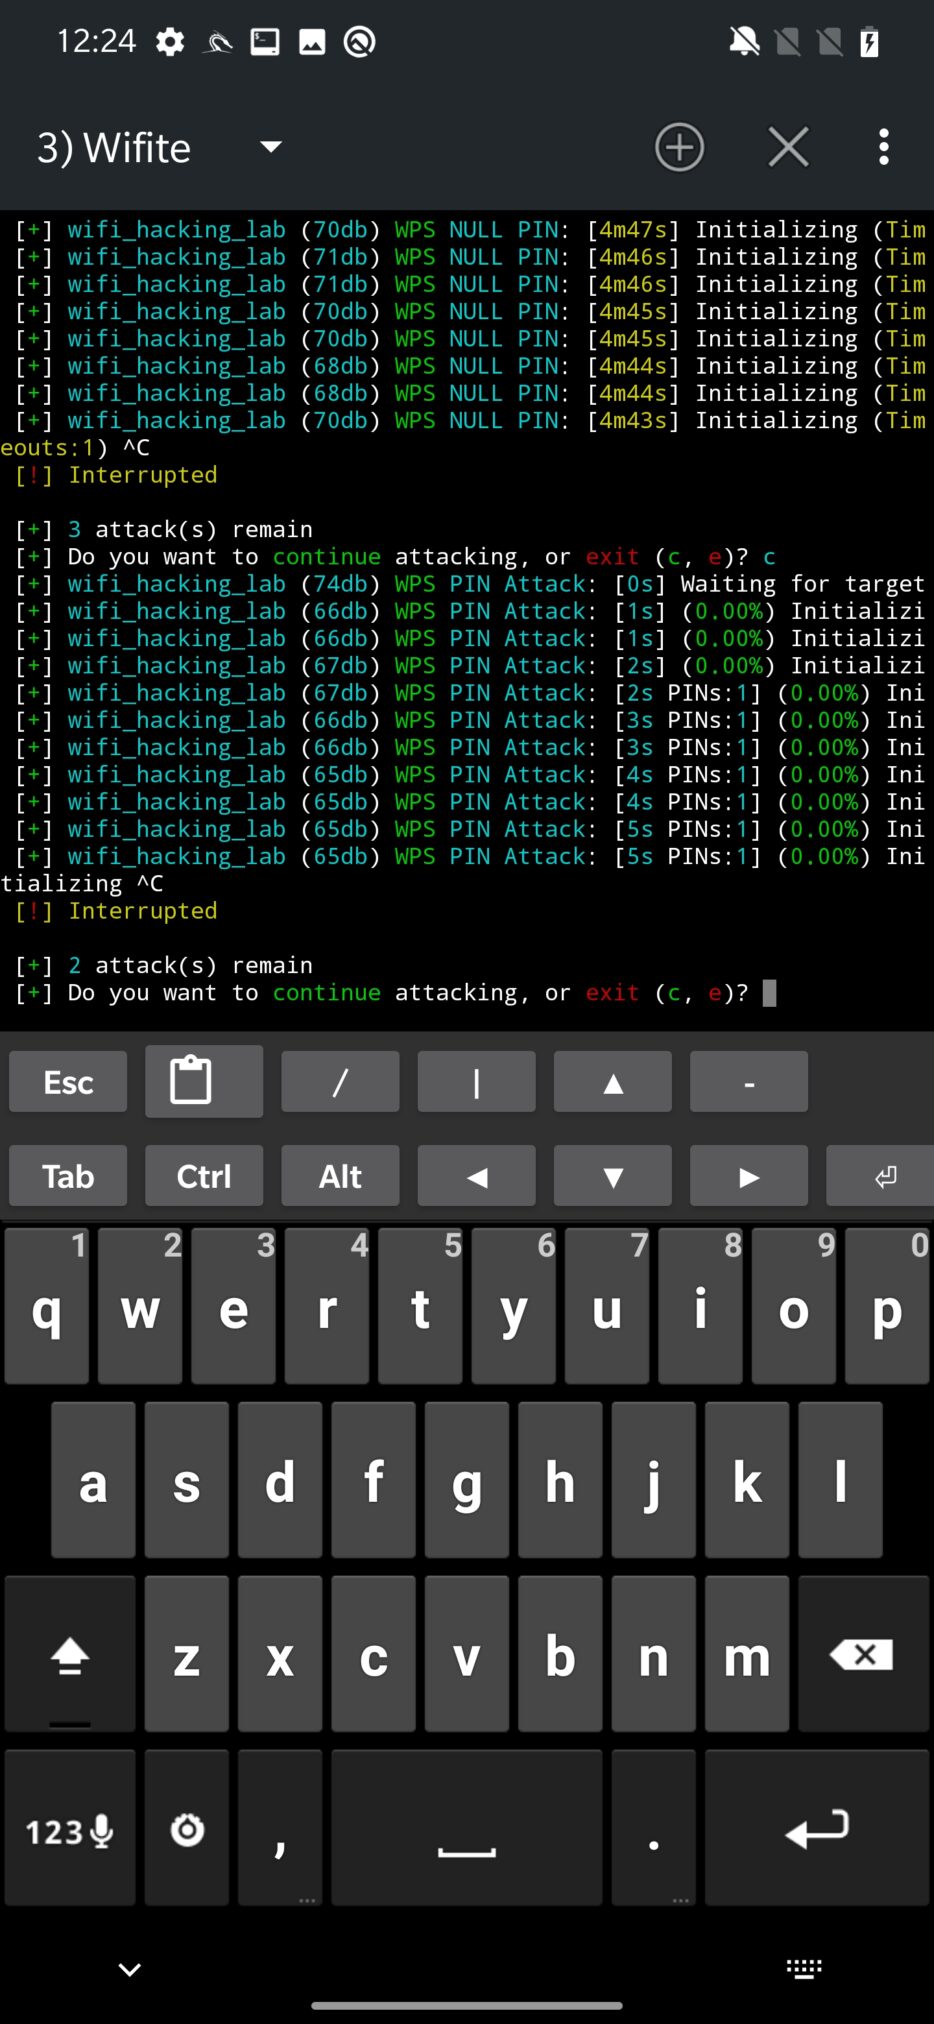
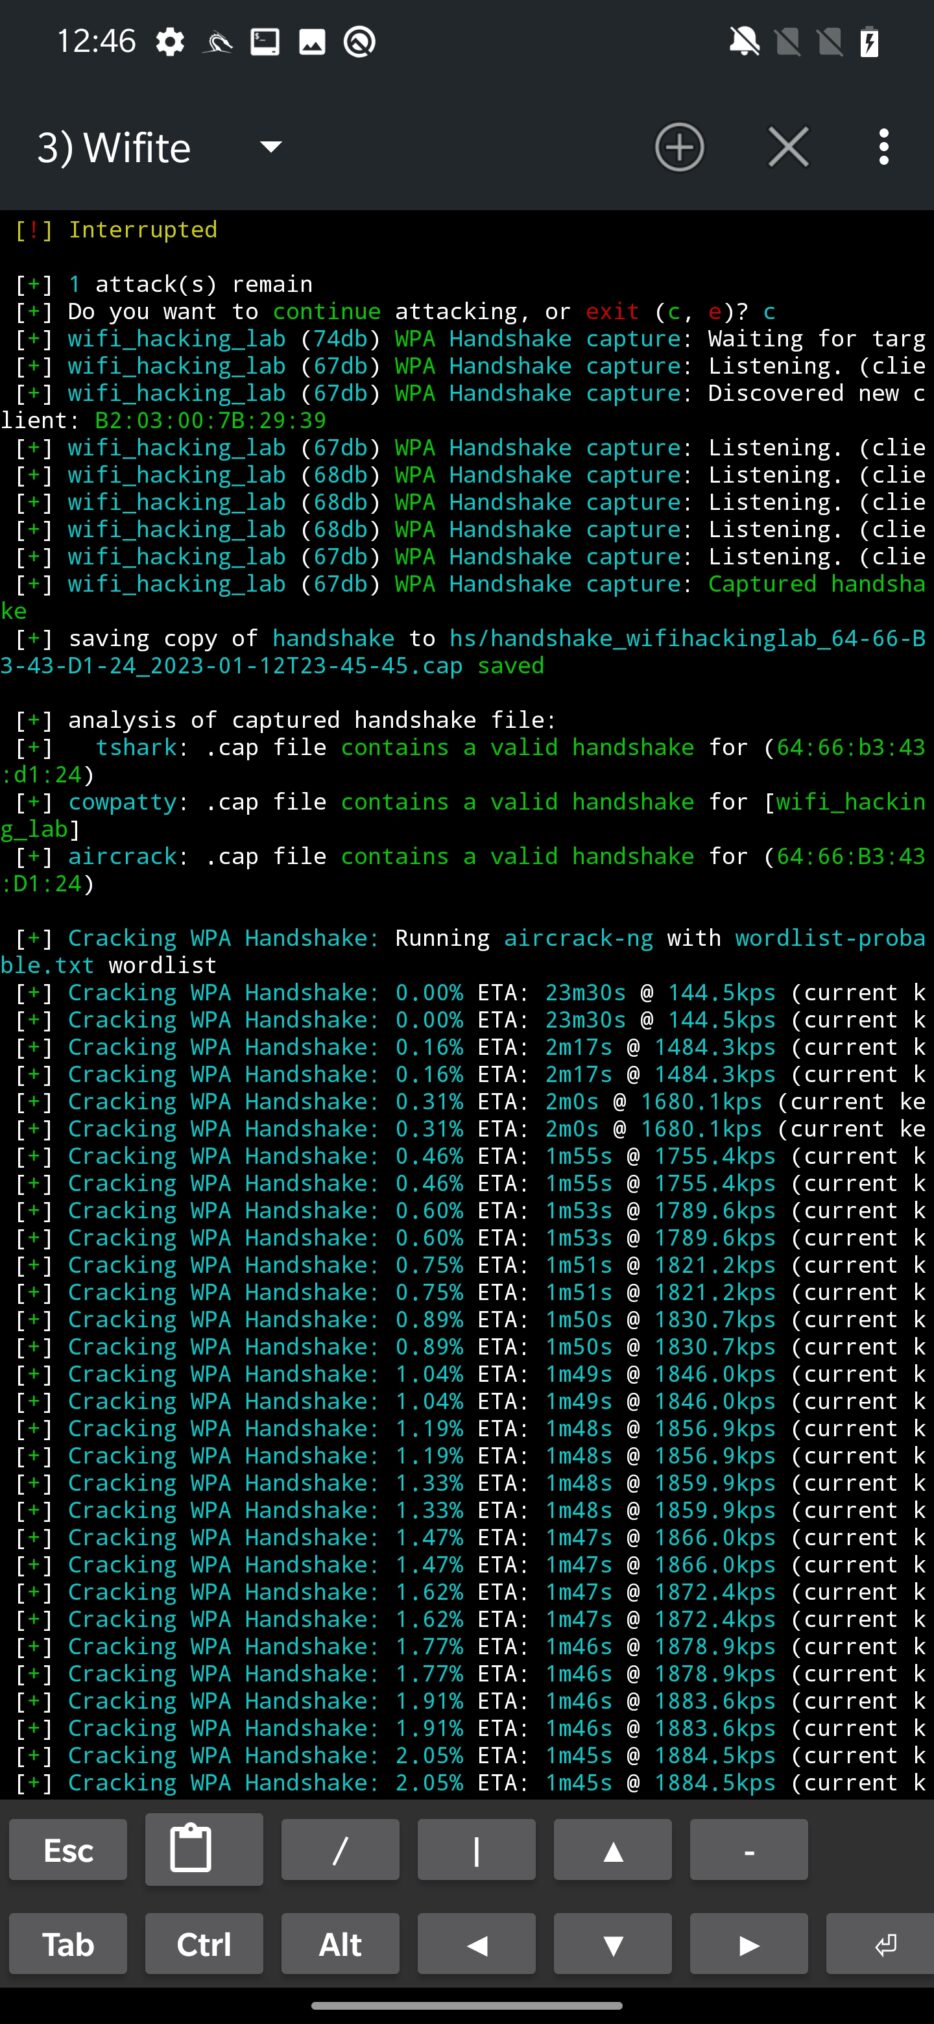
Followed by PMKID hash capture. Once obtained, it can be used to crack the Wi-Fi network password.

The final attack attempts to obtain WPA handshake that can be captured in case a new client is associated with network. If there is not new client and there are some already connected, deauthentication might help with this problem. Such captured handshake is then saved and analyzed for validity. If it is not corrupted, Wifite will start to crack it using bruteforce technique by using wordlist stored at /usr/share/dict/wordlist-probable.txt. Naturally, it can be expanded with your custom wordlist.

Deauthentication attack using DeAuth option
Wi-Fi deauthentication feature allows you to disconnect devices from a wireless network by sending deauth packets. You can use it to test the security of a wireless network, as well as to disconnect devices from a network to connect to it with a different device. It is an offensive security tool that you can use in a pentesting scenario to impersonate another device on the network, disconnect targeted device and force it to connect to a rogue access point under your control, obtain four-way handshake that is then used to decrypt the Wi-Fi network password or to disconnect unwanted devices intruders from accessing your personal Wi-Fi network.
It’s worth noting that deauthentication attacks are illegal in many jurisdictions, and should not be performed without the explicit permission of the network owner.
As a first, you need to set which interface you want to use for deauthentication, which in most cases will be external wlan1, and scan for available networks. From the list that will appear, you can deauth all connected clients from the access point only, which means that using GUI interface you can’t disconnect individual devices. In the bottom edit box enter the channel of the Wi-Fi network you want to deauth. You can also whitelist MAC addresses of devices you don’t want to disassociate, including your device (MAC address of wlan0). The list of whitelisted devices can be edited and is stored at /sdcard/nh_files/deauth/whitelist.txt. Once setup, you can START DEAUTHENTICATION as you can see in Figure 8.

NetHunter app will enable monitoring mode and executes mdk3 tool to deauthenticate clients. There is a small issue in the code, when the script is executed, it assumes that every interface in monitoring mode will have appended string “mon” after interface name. This is correct, but only for a few Wi-Fi adapters like TP-LINK TL-WN722N. Because of that, I advise you to set the proper name of your interface and run the command again.

Wardriving
Wardriving is the act of searching for wireless networks, usually by driving, using a laptop or smartphone. The goal of wardriving is typically to locate open wireless access points for the purposes of unauthorized access to the Internet or to identify weaknesses in the security of a wireless network.
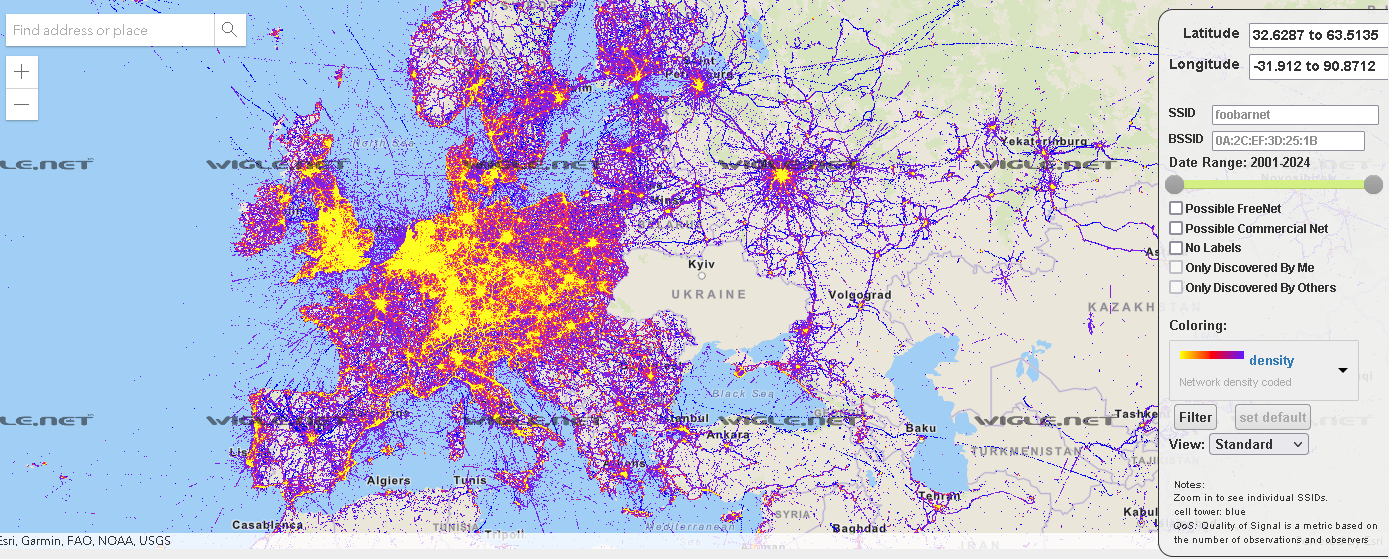
There are groups of wardriving enthusiast that share their finding online with accurate GPS location for particular discovered Wi-Fi networks, Bluetooth devices and cell towers. These findings are accessible at wigle.net, as you can see on a heatmap in the Figure 10.
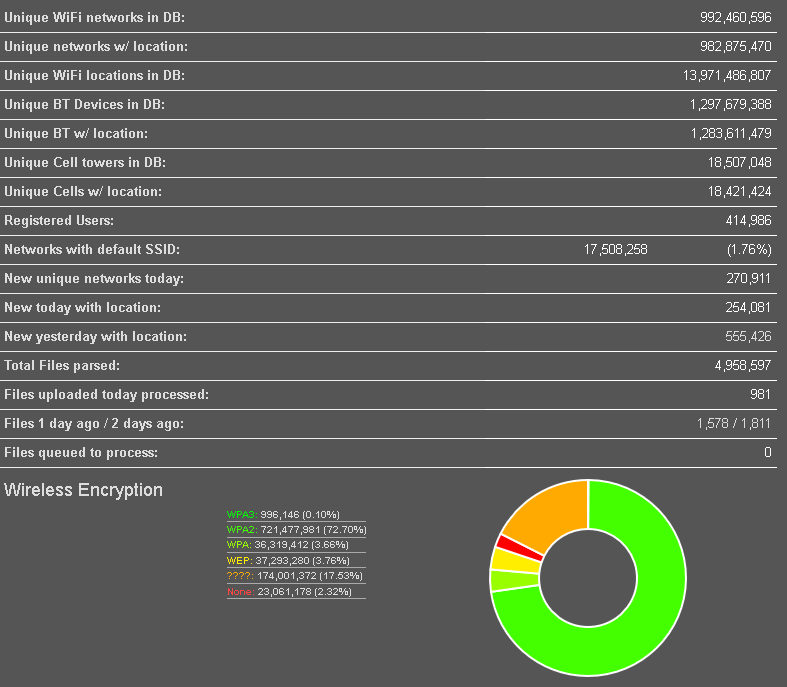
At the time of write the blog, there are listed over 992 million of Wi-Fi networks and 1.3 billion Bluetooth devices. From the statistics, based on all the gathered data, only around 2% of Wi-Fi networks don’t use any encryption.
That is enough for theory, lets jump back to test Wardriving ourselves.
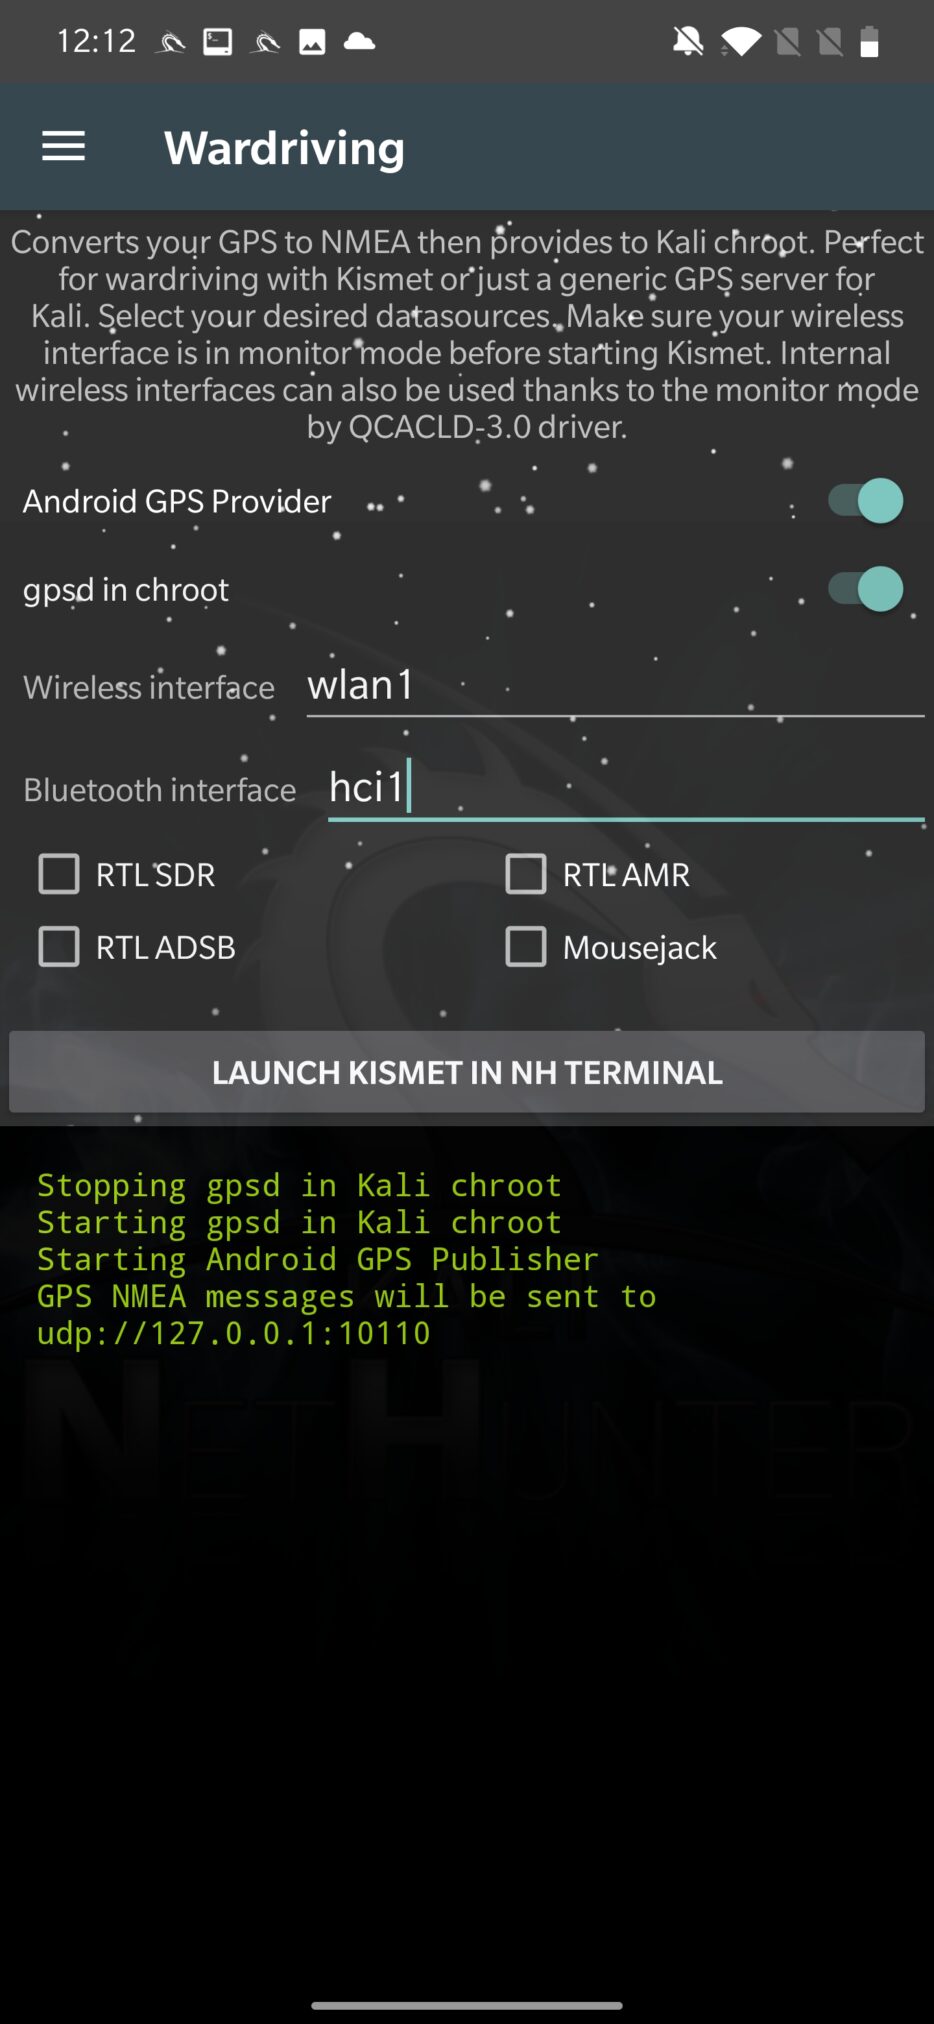
From options, enable GPS Provider and gpsd in chroot. Don’t forget to enable Location in Android’s quick settings dropdown menu. Enter which wireless interfaces you would like to use and enable monitoring mode for your Wi-Fi adapter. I have used a USB hub so I could connect external Wi-Fi and Bluetooth adapter at once. With further check boxes that require additional hardware, you can discover Software-Defined Radio (SDR) signals, Automatic Dependent Surveillance-Broadcast (ADSB) to locate aircraft, Automatic Meter Reading (AMR) used for remotely collecting data from utility meters, such as electricity, gas, water meters and Mousejacking to find nRF-based wireless mice and keyboards as you can see in Figure 12.
Now we can launch wardriving using Kismet framework. Kismet is a wireless network and device detector, sniffer, wardriving tool, and WIDS (wireless intrusion detection) framework. It works by passively capturing wireless packets and analyzing them to identify wireless networks and clients.
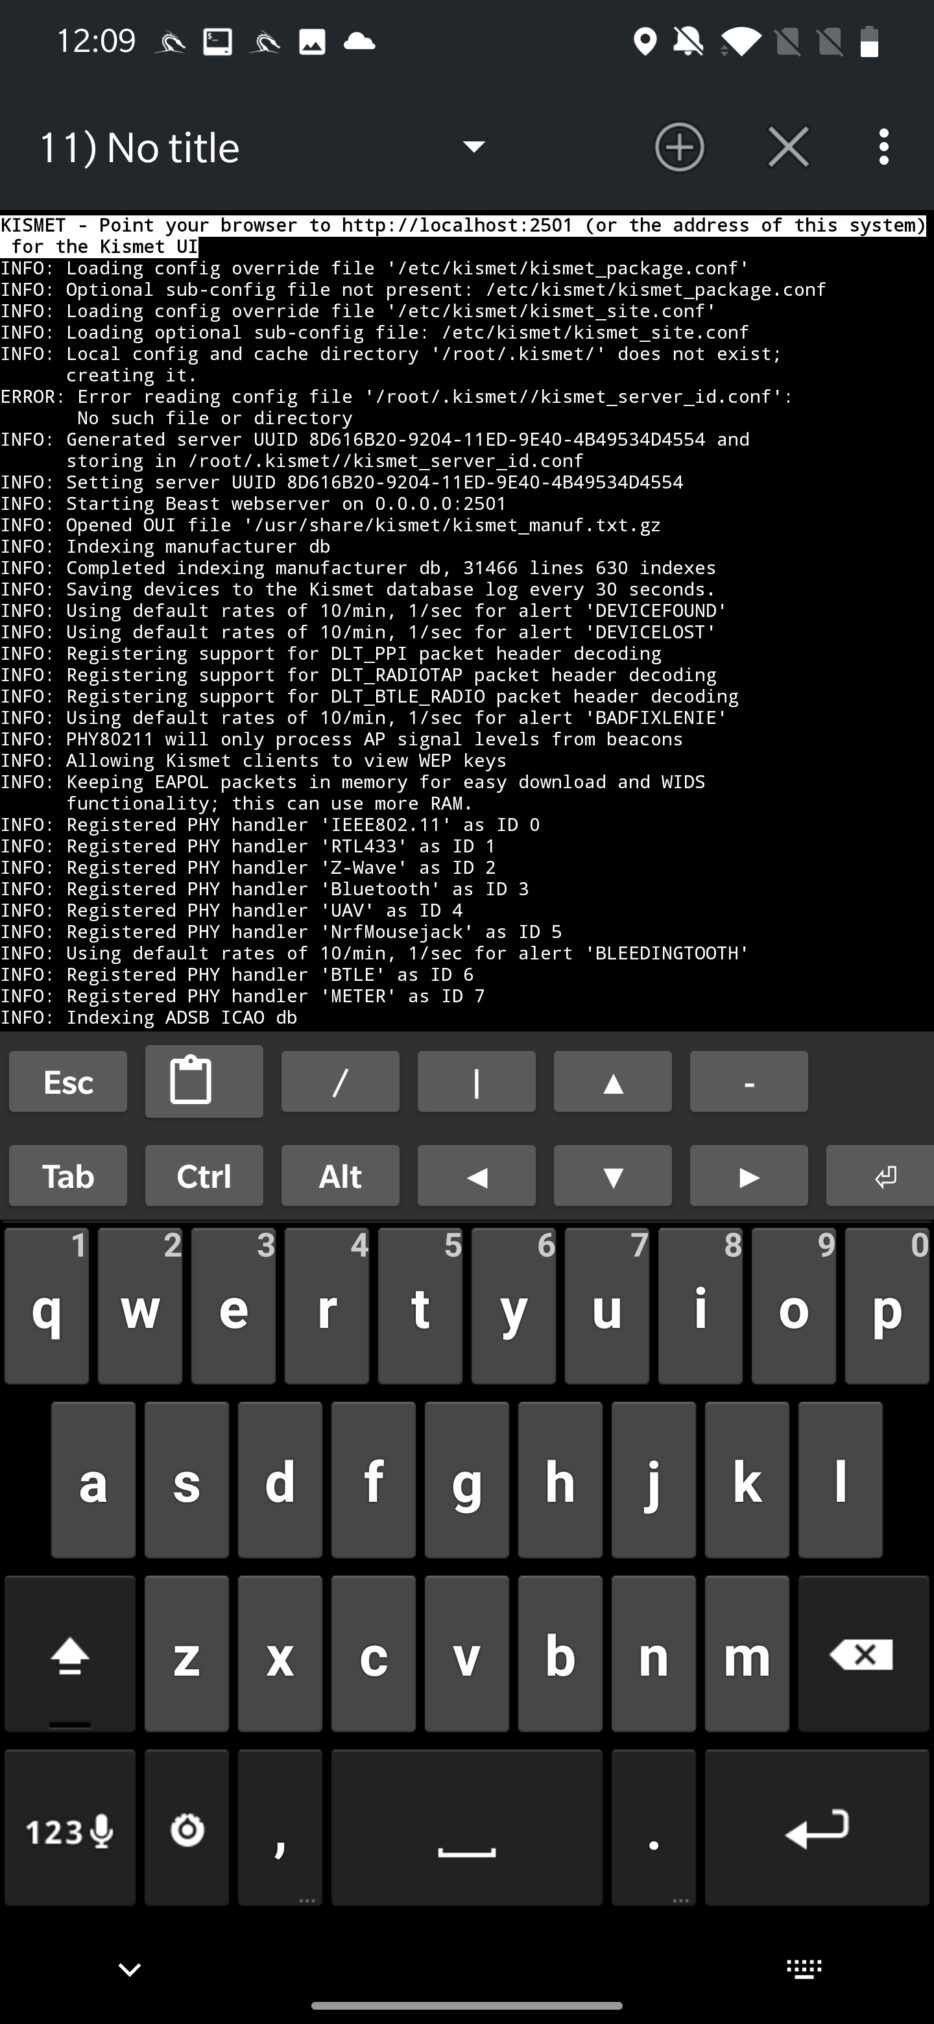
After launch, it will execute in NetHunter Terminal and logs all the discovered devices in console, as is visible on Figure 13.
This output might not be easily readable for many of you. Because of that, Kismet also starts local server on localhost:2501 to provide a better visibility on discovered data and more organized access to collected information, as displayed in Figure 14.
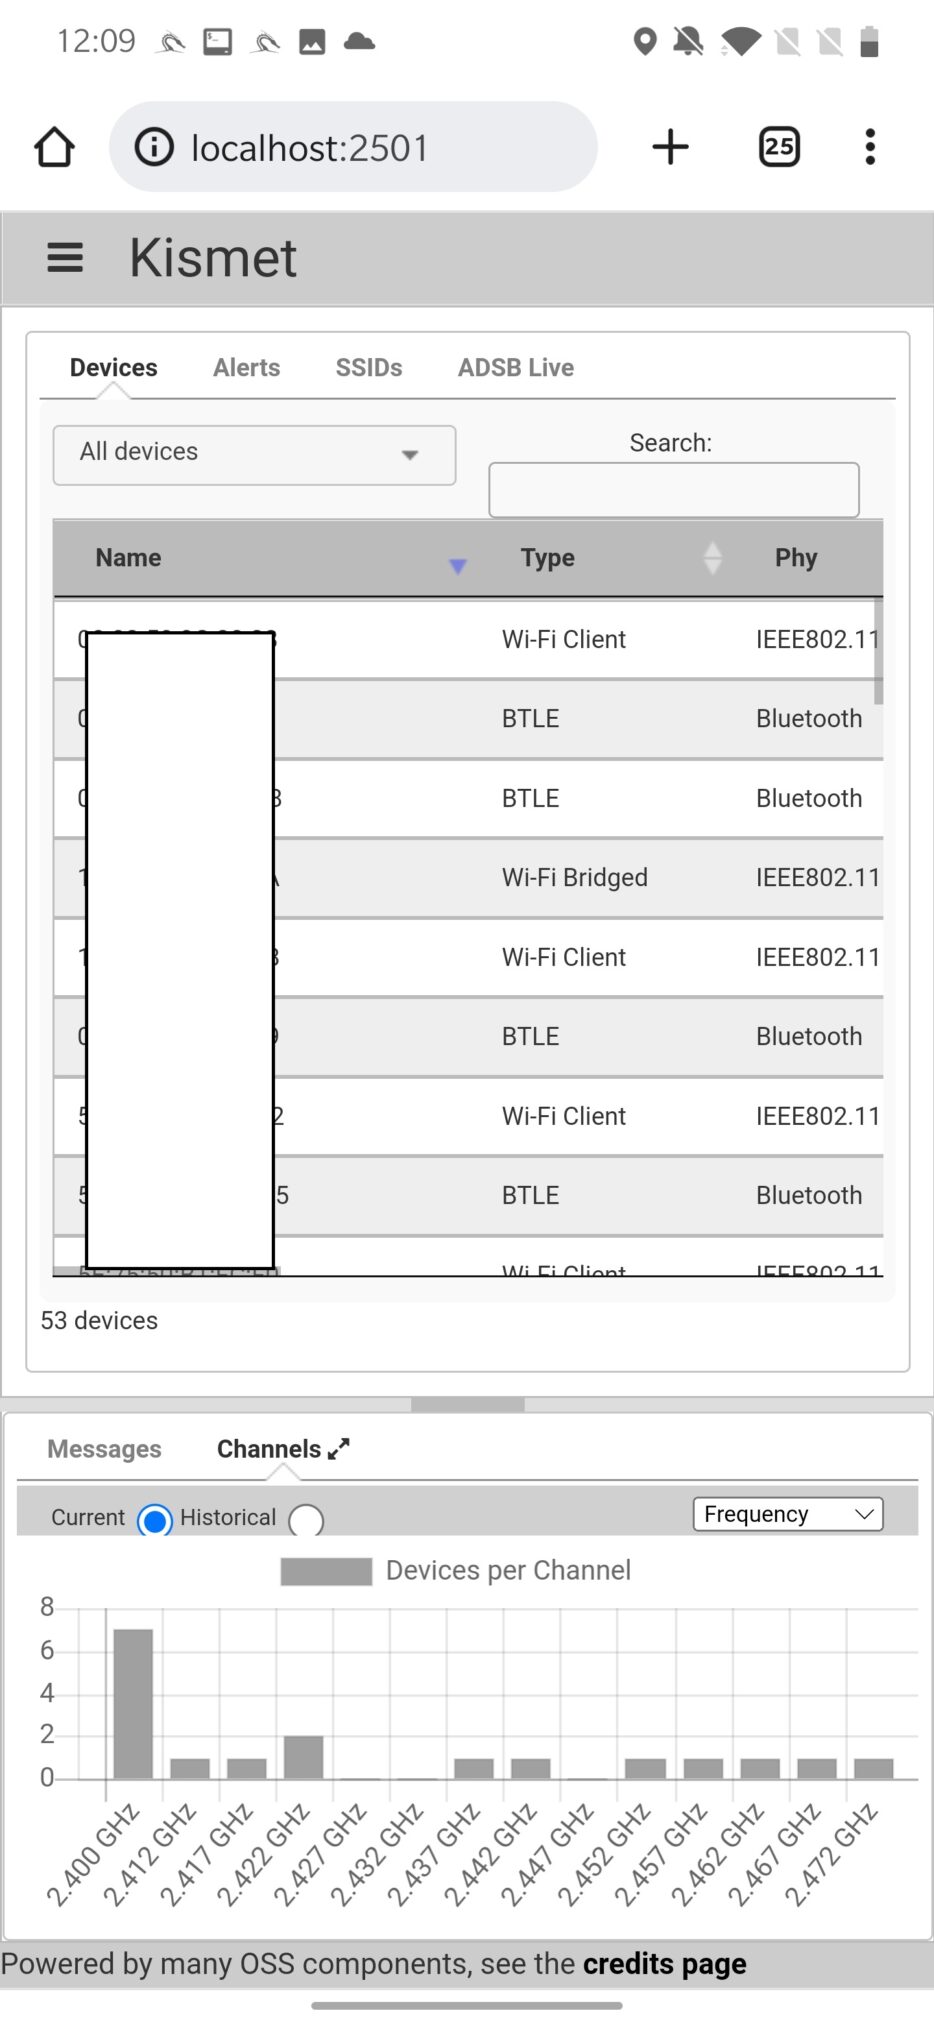
It will collect and log, and after closing the session stores in database, network Information such as information about wireless networks, including the SSID, MAC address, channel, signal strength, encryption type, and other details. Device Information such as information about wireless devices, including the MAC address, signal strength, and the network(s) to which the device is connected. GPS Information like GPS coordinates for each wireless network and device. Kismet can capture and log wireless packets, which can be analyzed to identify the type of device, network, or application being used and many more.
Preventing attacks
Here are a few tips to help you prevent and stay safe from WiFi attacks:
- Change default password: Make sure to change your default router password to protect your access point from any unauthorized changes.
- Use a strong encryption: Make sure your wireless network is using a strong encryption method, such as WPA2 or WPA3, to protect your network from unauthorized access.
- Use a strong password: Use a strong, unique password for your wireless network to prevent attackers from guessing it easily. Avoid using easily guessable information like your name, address, or birthdate that might be in a common bruteforce wordlists.
- Keep your router’s firmware up to date: Regularly check for and install firmware updates for your router to protect against known vulnerabilities.
- Disable WPS: WPS (Wi-Fi Protected Setup) is a feature that allows for easy setup of wireless networks, but it has been known to have security vulnerabilities. It’s best to disable WPS on your router if possible.
- Be cautious with public WiFi networks: Be wary of connecting to public WiFi networks, as they may not be secure. Avoid entering sensitive information, such as financial details or login credentials, while connected to a public WiFi network.
- Educate yourself: Stay informed about the latest WiFi security risks and best practices by reading articles and tutorials from reputable sources.
Conclusion
Wi-Fi networks are a popular target for hackers due to their widespread use, possible weak or no security and potential vulnerabilities. As an ethical hacker, it is important to understand the various methods and techniques that can be used to exploit Wi-Fi networks, as well as the legal and ethical considerations surrounding such actions. It is also important to understand that unauthorized hacking or attempting to access a network without permission is illegal in most jurisdictions, and it should be avoided. While it is important to have knowledge of the potential vulnerabilities and weaknesses in Wi-Fi networks, it is crucial to use that knowledge solely for legal and ethical purposes such as penetration testing and improving the security of networks.

Excellent and very informative indeed……
Wow
Hi, which model of Alfa Network do you use?